1. Installation diagram of PVC gutter falling water system
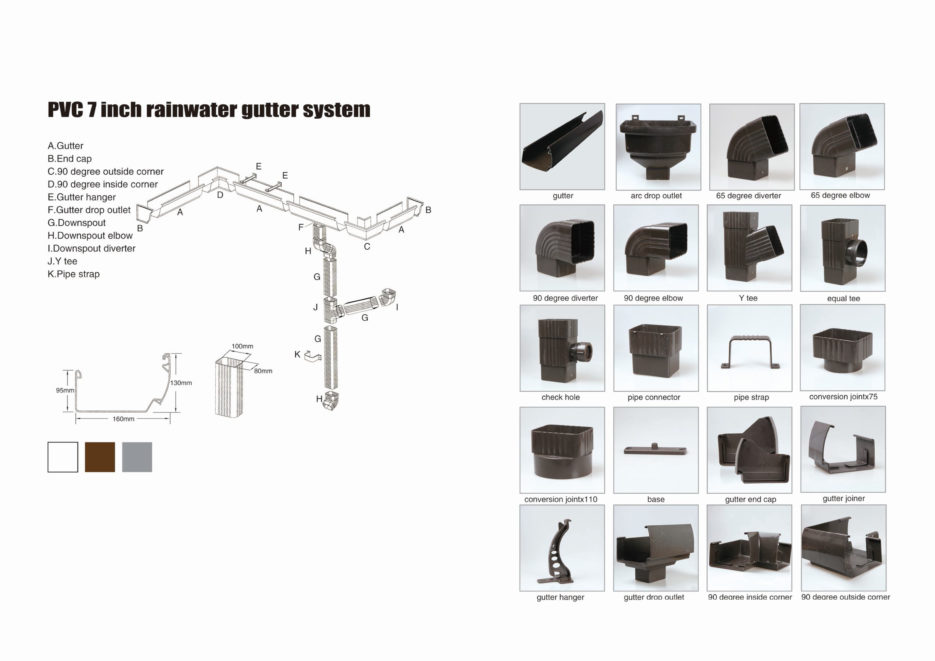
1-1. Schematic diagram of PVC gutter water system:

1-2. PVC gutter water system node diagram:

1-3. Roof structure drawing of PVC falling water system:
Note 1: The thickness of the cement mortar leveling layer of the eaves is not less than 3cm to ensure the nail-holding strength of the plastic expansion bolt of the skyhook hanger.
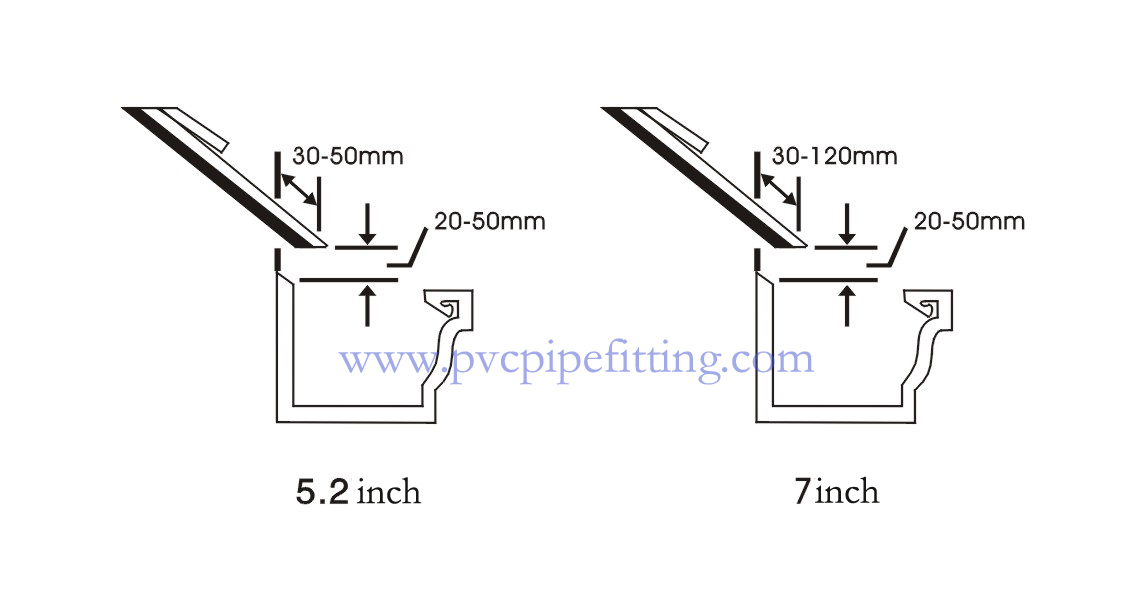
Note 2: The front end of the roof tile exceeds the inner wall of the gutter (5.2 inches) by 30-50mm, (7 inches) by 30mm-120mm, and the height from the inner wall of the gutter is between 20mm-50mm.
Note 3: When the roof cornice is not perpendicular to the ground, a wedge pad (angle adjuster) must be added between the cornice and the gutter to ensure that the gutter is level.
1-4. PVC drain system catchment calculation and downspout location:

Note 1: O is the position of the downpipe, T is the highest point of the gutter, and the dotted line is the roof ridge.
Note 2: Install rainwater bucket (outlet) according to the design requirements of construction drawings
Note 3: Try not to climb the waistline for the downpipe to ensure the smooth flow of water.
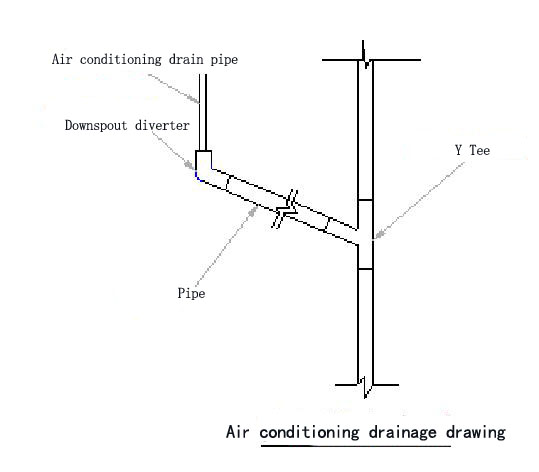
Note 4: Separate drainage pipes should be set up on the balcony as far as possible, and the air conditioning condensate can be connected to the roof rain drainage pipe with an oblique tee or a reduced tee.
1-5 Timing of installation:
After the roof tile paving and the eave surface painting are completed, the gutter is installed before the scaffolding is removed, and the downpipe is installed according to the progress of the wall surface.
2. Installation of gutter
2-1 Determine the location of the downpipe:
According to the characteristics of the construction house roof, choose a reasonable downspout location. (According to the requirements of construction design drawings)
2-2 Draw a guideline:
Use an ink line from one end of the cornice to fix it at a position about 20mm-50mm down from the front end of the roof tile, and draw a line with a gradient of 10mm every three meters toward the drain to draw the gutter guideline.
2-3 Determine the length of the gutter:
A If the cornice in this section is straight, the cornice and the gutter are the same lengths.
B If the cornice is longer than the gutter, the gutter needs to be connected in sections.
C If the gutter has an outside corner of 90°, each corner will add a inside angle of 90°. For example, if the gutter has an outside corner of 135°, each corner will add a inside angle of 135°. Otherwise, use 90° or 135° outside angle.
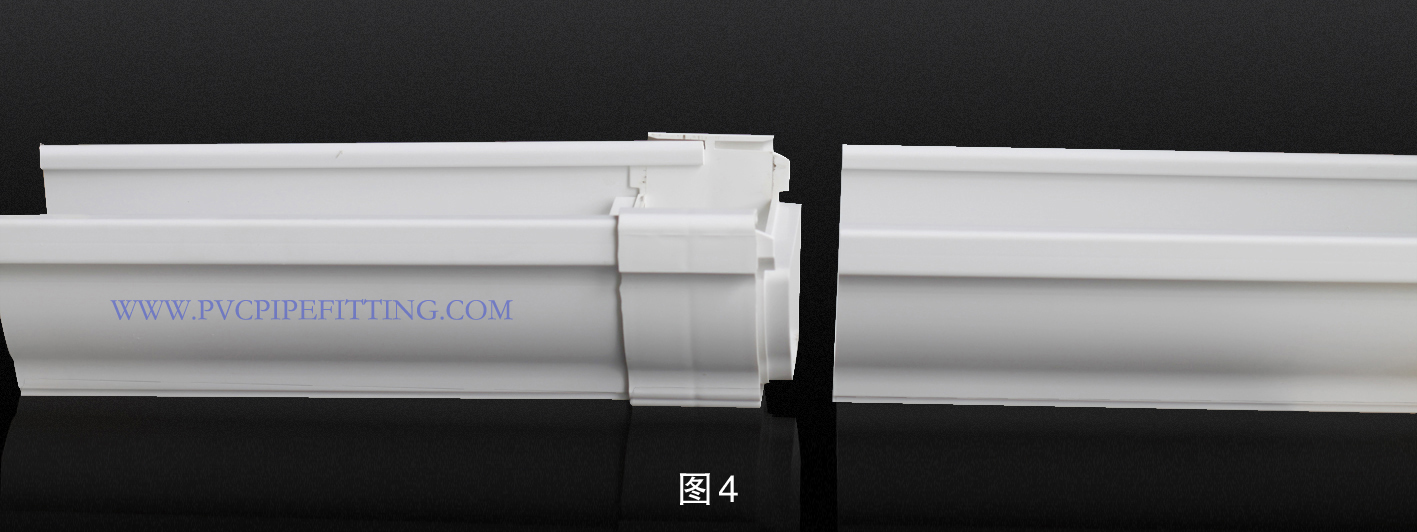
2-5 Use and installation of the card connector
The card connector is used for the connection between the gutter and the gutter (as shown in Figure 4). Before use, the socket joint of the card connector is filled with waterproof silicone, and then the gutter is inserted into the socket joint of the card connector.

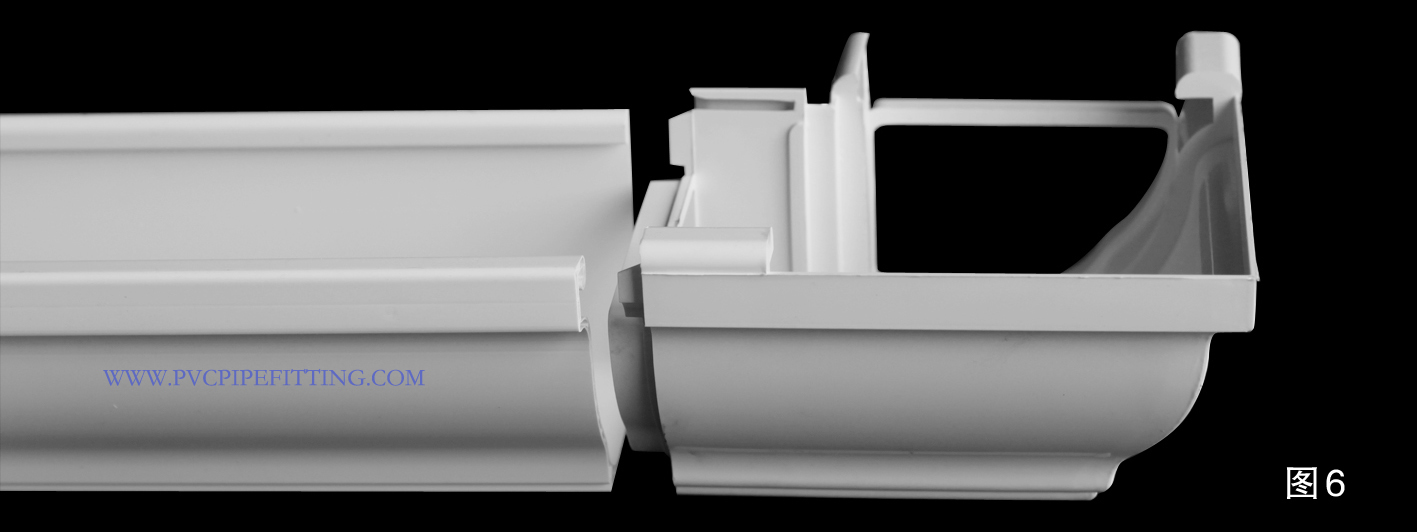
2-6 Use and installation of 90° inside and outside angle, 135° inside and outside angle
The 90° inside and outside angle, 135° inside and outside angle are used at the corners of the horizontal eaves (as shown in Figures 5 and 6), and the installation method is the same as that of the card connector
2-7 Use and installation of end cap
The end cap is used to seal the end of the gutter (as shown in Figure 7), and the installation method is the same as that ofthe male and female corners of the clamp

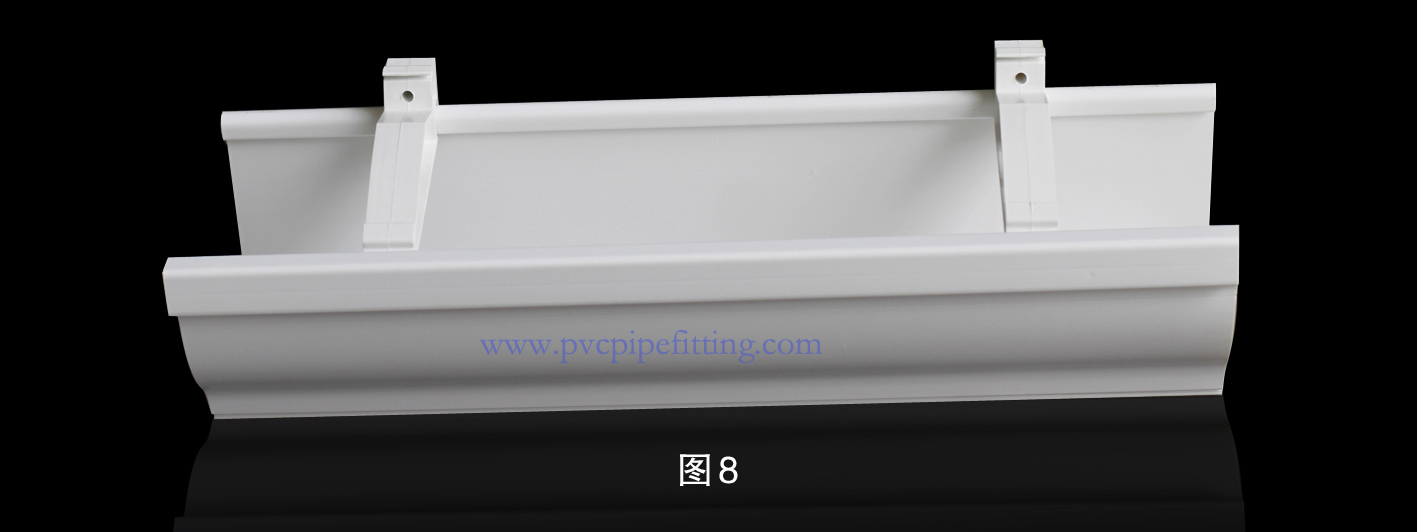
2-8 The use and installation of the spreader:
A. The hanger is used to fix the gutter on the cornice (as shown in Figure 8), and the hanger is inserted along with the gutter port, and the distance between the hangers is controlled, generally 300mm-500mm,
B. A hanger must be added at the joint of the gutter and 30mm at both ends of the corner to prevent sagging at the joint of the gutter.
C .Use a 6mm impact drill to drill holes on the eaves gutter guideline according to the distance of the spreader, the depth is more than 50mm, then insert the expansion plug into the punched hole, and fix it with 4mm×60mm stainless steel self-tapping screws to cover the gutter of the spreader
Note: If the roof eaves are of solid wood structure, the eaves do not need to be punched, and the eaves can be directly fixed on the eaves with screws.
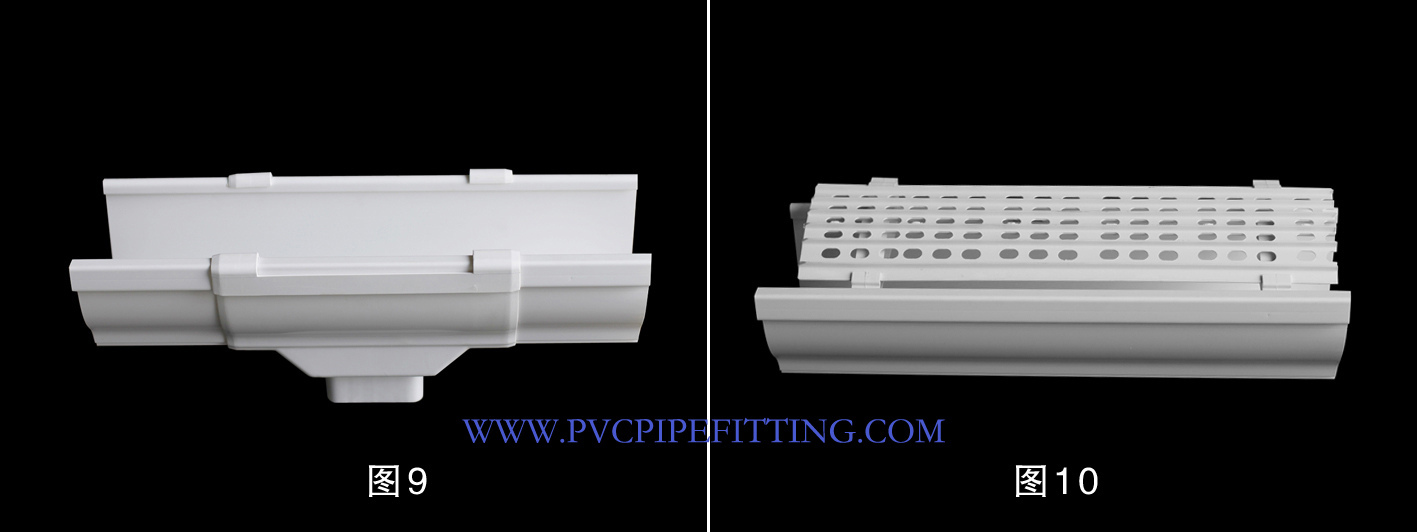
2-9 Use and installation of rainwater bucket
The rainwater bucket is used for centralized drainage of the gutter (as shown in Figure 9). When installing, first open the drain on the gutter, and then evenly smear the inner wall of the two ends of the rainwater bucket with waterproof silica gel, and buckle the front of the rainwater bucket first. The outer edge of the eaves gutter, and then pull the rainwater bucket backward and upward, and buckle the back of the rainwater bucket to buckle the inner edge of the gutter.
2-10 Retaining Leaf Net
The retaining leaf net is used to cover the gutter (as shown in Figure 10) to prevent leaves from falling into the ditch and blocking the drain of the gutter. The retaining leaf net is fixed on the hanger, and there are small gaps at both ends of the hanger. Just put the baffle leaf network card on the spreader.
3. Install downpipe
3-1 Cutting and installation of rainwater pipes:
Calculate the length of the downspout according to the position of the downspout. Cut the downspout. The cut downspout must be flat, clean the burrs, and then receive the water pipe from the gutter outlet. The rainwater pipe is fixed on the wall with a locator, and the rainwater pipe hits during installation. Obstruction, you need to use a drain or diverter to bypass the obstruction,
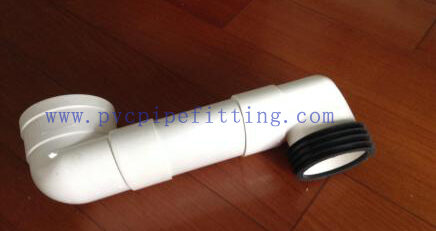
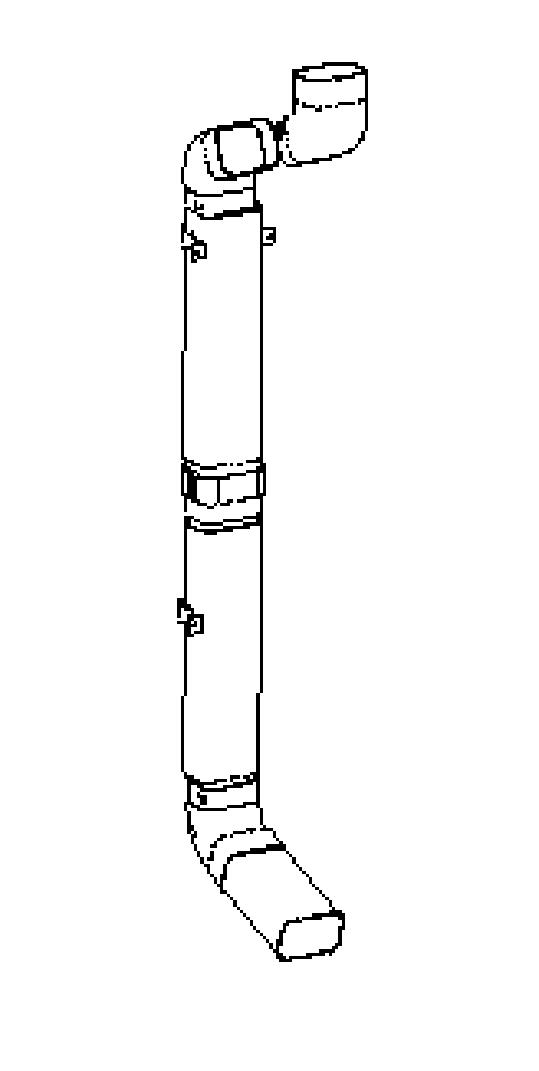
3-2 Use and installation of 65° drainage device and diverter, the interface device
The diverter is used for turning the rainwater pipe back and forth (see Figure 12), the diverter is used for turning the rainwater pipe left and right, and the connector is used to connect the rainwater pipe and the rainwater pipe (see Figure 12). When installing, the diverter (diverter, connector) The large size of the socket faces the reverse direction of the water flow. The rainwater pipe is inserted into the drainage device (diverter, connector) in the downstream direction (see Figure 12), and the small end of the drainage device (diverter, connector) is inserted into the rainwater pipe in the downstream direction. Use 4mm×30mm stainless steel screws to fix the connection part of the rainwater pipe and the drain (as shown in Figure 12). Note: Each fitting socket should be evenly smeared with waterproof silica gel.

3-3 The use and installation position of the positioner:
The locator is used to fix the rainwater pipe on the wall (as shown in Figure 11). According to the position of the spout, use a wire drop to determine the verticality of the rainwater pipe and determine the position of the locator; the maximum distance between the locator should not exceed 1500mm,
The downspout is in units of heels (3 meters/piece). A locator is set 100mm below the rainwater pipe port, and the locators are arranged at the end of the rainwater pipe in turn.
Use a 6mm diameter electric drill to drill holes on the wall with a depth of not less than 40mm. Use plastic expansion bolts to fill the holes, and then fix the positioner with 4mm×60mm stainless steel self-tapping screws. If the wall has an insulation layer, you must use extended expansion bolts. , To ensure that the expansion plug is fully expanded and fixed firmly.
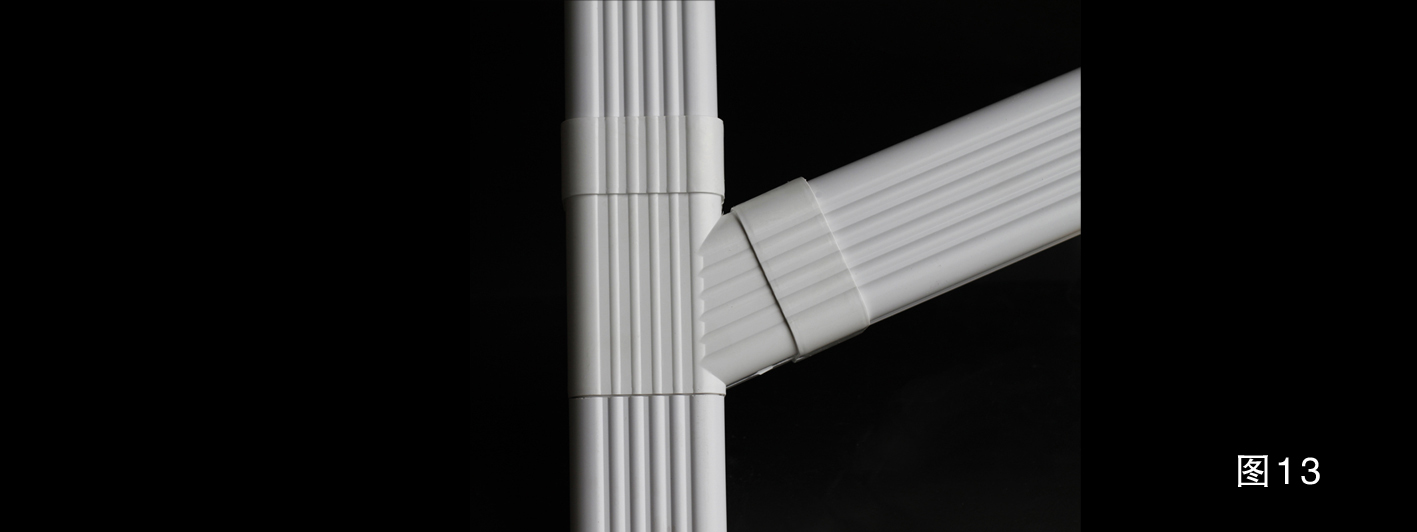
3-5 Use and installation of 3-5 inclined tee and reducing tee
Inclined tee and variable diameter tee are used to connect the condensate water from the side of the balcony or into the roof downpipe (as shown in Figure 13). They are installed like a drainer. The diameter of the inclined tee branch is consistent with that of the rainwater pipe, and it is inclined to the reverse direction of water flow at 65 degrees. The diameter of the variable diameter tee branch is 50 mm for five inches and 75 mm for seven inches.
3-6 Use and installation of 3-6 square circle conversion
Square to round conversion is used to convert a round pipe into a straight pipe or a straight pipe into a round pipe. The rainwater pipe connector is used for splicing. The installation method is the same as that of the connector.
4. Special installation nodes
(1) installation of Aquaplane
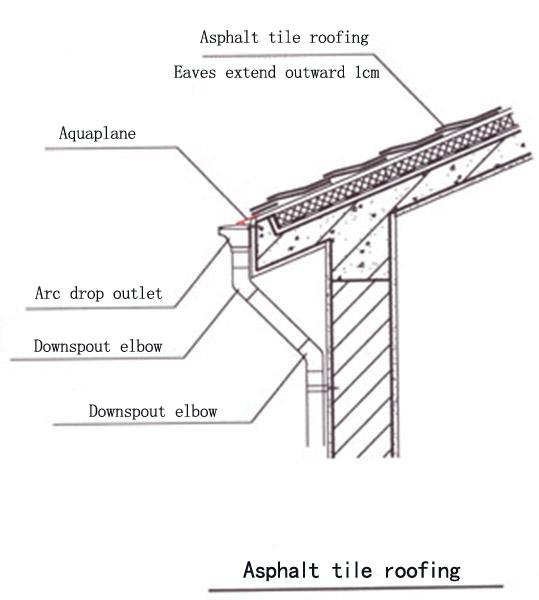
1) installation of asphalt tile / linoleum tile
When the Aquaplane is installed on the asphalt tile / asphalt felt tile, the tile must be laid on the outside of the roof eaves 1cm. In order to facilitate the installation of Aquaplane, please do not use asphalt glue to bond the substrate tiles after nailing the substrate tiles. When installing the water-falling system, a section of Aquaplane frame is first connected to the roof along the slope of the roof, and the rib energy frame at the bottom of the water-skiing board is on the slot of the eaves hanger, and the rib line at the bottom of the parallel water-skiing board is used as a horizontal auxiliary line at the position of 5mm below. Then, the installation of the gutter is completed. Lift the substrate tiles and the initial layer tiles, insert the Aquaplane into the eaves, and use stainless steel nails along the Aquaplane with reserved holes to nail, the lower end of the Aquaplane ribs to ensure a firm drive in the eaves slot hanger slot mouth.
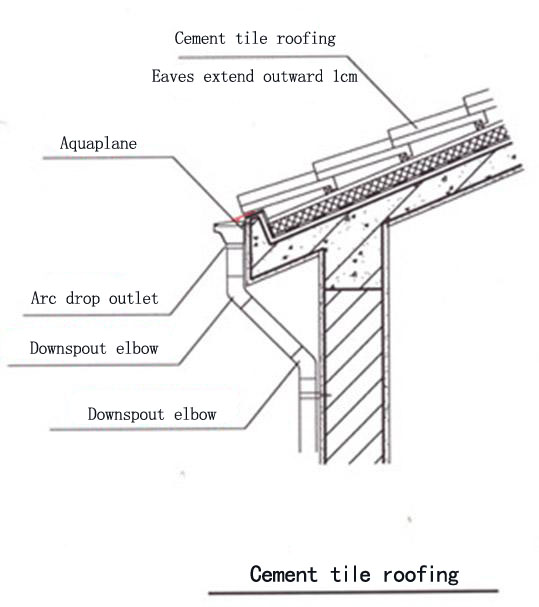
2) installation of cement tiles
If the roof tile is a cement tile, the Aquaplane must be installed, and the tile must be placed outside the eaves 1cm. Before laying the tile, nail the water ski along the roof slope and reserve the nail holes according to the Aquaplane, nail the Aquaplane on the downstream strip, (if there is no downstream strip, nail it directly on the roof structure layer.) The ribs at the bottom of the water ski should be able to be erected on the gutter of the eaves hanger. After the tiles are laid, a horizontal auxiliary line is made at the position of the rib line at the lower end of the parallel Aquaplane at the position of 5mm downward, and the position of the guide line and the eaves hanger are determined. The installation position of the corresponding eaves slot hanger is on the corresponding position of the water slide board. The eaves slot hanger is inserted into the hole with the scissors and the holes with the width of 27 mm are respectively opened on the arc protrusion and the ribs of the water slide board. The expansion bolt is fixed on the eaves mouth. The ribs at the lower end of the Aquaplane are guaranteed to drive firmly on the inner slots of the eaves slot hanger. Then, the installation of the gutter is completed.
(2) installation of balcony floor drain
When dealing with the balcony floor leakage, the standard atlas (DBJT08-81-97) is used to pre-bury a circular pipe with a diameter of 75 mm to connect the rainwater pipe transfer connector, a rainwater pipe to connect the rainwater pipe diverter, and a rainwater pipe to connect the vertical inclined tee to lead the balcony water into the whole falling water system.

3) Installation of split air-conditioning effluent, treatment of split air-conditioning effluent, through the rainwater pipe diverter, inclined three-way connection rainwater pipe, air-conditioning into the whole system.
Remarks: there are 2 kinds of water outlet sizes for one and five inches of rain water: 63mm, 63mm and 63mm, 83mm.
The second, 65 * 85 square tube has 65 degree, 90 degree steering gear and drain; the 102 * 70 square tube has only 45 degree steering gear and drain.
(3) The conversion connection of the Royal two PVC square tubes is:
(1) There is only one connection for the 102*70 square pipe to be converted to the 110 round pipe. The square pipe is butted at one end (with an interface) and the 110 round pipe is inserted into the converter joint.
(2) conversion joint of 65*85 square pipe
The adapter for the 75 round pipe is the same with both the caliber and the caliber of the pipe.
The transfer joint of the 110 round pipe is inserted inside the adapter.
(4) 65*85 square tube has three kinds of three links.
(1) connect the 55*85 square tube to the lateral oblique three links;
(2) connect the 50 circular tubes to the lateral straight three links;
(3) connect 50 round tubes to forward three links.
(5) 102*70 square tube has 2 kinds of three links.
(1) turn the 50 round tube side inclined three links;
(2) turn the 70*102 square tube side inclined three links.
Installation video